About
BLOG

Interested in a little light reading?

Our blog is continually updated with helpful educational information, advises, research and insights—all in the name of helping you level-up your color and appearance needs. Grab a drink and enjoy our stories!

Explore Our Stories

"SPC Results for Diagnostic Didymium Filter Test"

Read More

Explore Our Products

VIEW MORE

"How can I perform a first-time installation of EasyMatch QC software?"

Read More

"Using ASCII Export on Multiple Jobs"

Read More

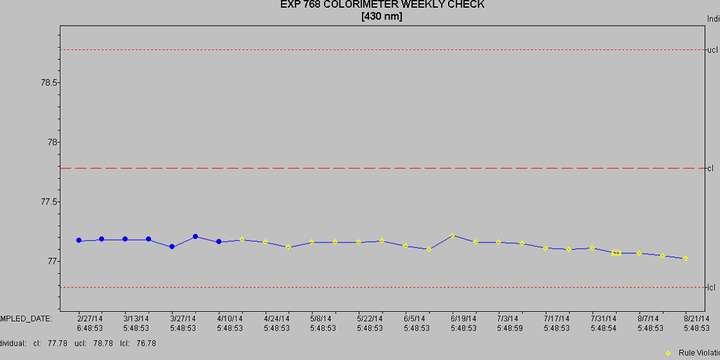
SPC Results for Diagnostic Didymium Filter Test

Posted on Feb 09, 2024 by HunterLab

FAQ: “We take the results from the Didymium Filter Test on our HunterLab Vista and plot them in an SPC chart over time to look at trends. We are seeing the 430 and 570 nm filters slowly decrease. Can you help us understand what may be occurring?”

The Didymium Filter Test is an instrument diagnostic test designed to allow the user to self-certify that the wavelength alignment of the instrument optical path is consistent over months and years since the sensor was last wavelength calibrated at the factory.

Posted in EasyMatch QC

How can I perform a first-time installation of EasyMatch QC software?

Posted on Feb 09, 2024 by HunterLab

EasyMatch QC Software Installation and Configuration Guide for HunterLab SuperPro Hardware Key and Sensor Integration

  1. For either a network or local PC installation, the person installing EasyMatch QC software must be a System Administrator for the PC, with software installation privileges for both computers.
  2. On the PC, install the EZMQC software from the installation CD by activating the EasyMatch QC Menu program. Follow the steps to install the EasyMatch QC software to completion. Please note that you must see a “installation successful” message before you are done. Re-start your PC after the installation.
  3. Take the HunterLab SuperPro hardware key from the CD box and install it at any USB port on the new computer. Wait a moment for the hardware key to be recognized the first time by the operating system. The driver for this SuperPro hardware key was installed during the EasyMatch QC installation and will be found automatically by the operating system. This hardware key must be present every time you start up EasyMatch QC software, and when making subsequent measurements.
  4. Make sure your sensor is powered up. Then Start EasyMatch QC using the desktop icon or select “Start/Programs/HunterLab/EasyMatch QC”.
  5. The first time the program is run, you will be prompted to install a sensor at Sensor/Install-Configure.
  6. Select the appropriate sensor model and COM port for communications. Proceed to standardize the instrument using the bottom and top-of-scale standards. A successful standardization means that your HunterLab instrument and software is installation-qualified (IQ).
  7. EasyMatch QC will prompt you to re-start the software, and the sensor should be recognized and active when re-started.

If you have any installation difficulties, search our FAQs on EZMQC installation, or contact HunterLab.

Posted in EasyMatch QC

Using ASCII Export on Multiple Jobs

Posted on Nov 29, 2023 by HunterLab

Can you use the Automatic ASCII Export feature on more than one Job so that each Job exports to a separate file?

Providing everything is setup correctly within the EasyMatch QC software, it is possible to use the Automatic ASCII Export feature on more than one Job and to have each Job export to a different file. To make sure this is setup properly each Job must be saved once the ASCII Export configuration has been set. For more information on setting up the ASCII Export please see our blog note here.

Once you have designated the file name to be used in the ASCII Export Configuration screen make sure you go to File/Save Job. This will save your ASCII Export Configuration settings to your Job. You can then create a new Job, or open a Job and go to Options/ASCII Export/Configure and use a new file name as the designated location. When you are finished go to File/Save Job to save the configuration. This can be done for as many Job files as you need. Just be certain once you designate the export file name and location in Options/ASCII Export/Configure to save the Job by going to File/Save Job.

Posted in EasyMatch QC
Prev
1
Next

Most Related Posts

  • SPC Results for Diagnostic Didymium Filter Test
  • How can I perform a first-time installation of EasyMatch QC software?
  • Using ASCII Export on Multiple Jobs
More

Follow Us

  • LinkedIn
  • Twitter
  • YouTube